To autofit all the columns at once, follow these steps:
• Bring your cursor to the header of the column where you want to start autofitting. For example, I want to do it from column A
• Once you select the column, press the “ctrl” key and select the rest of the columns one by one up until the last column you want to autofit. For example, I want to autofit my columns till E.

• Once you have selected the column header, drag your mouse a little to the edge of the header of column E to get the plus (+) sign.
• Once you get the plus sign, double click on the mouse and your columns will be autofitted.
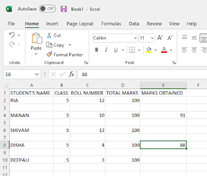
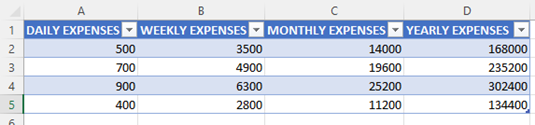
To create a table in Microsoft Excel 2019, follow these steps:
• Bring your cursor to the cell that has data.

• Press “ctrl+t”
• Click on the checkbox after checking your specifications and you will have created your table.
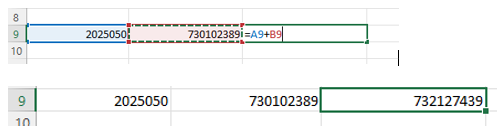
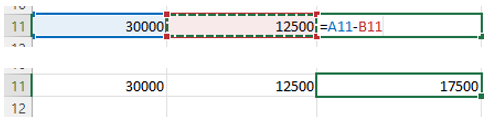
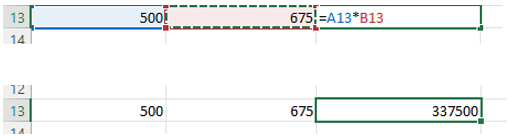
You can do several calculations on Microsoft Excel 2019. We will learn to do three types of sums:
a. Addition - “= <put cell number>+<put cell number>”
b. Subtraction - “=<put cell number>-<put cell number>”
c. Multiplication - “=<put cell number>*<put cell number>”
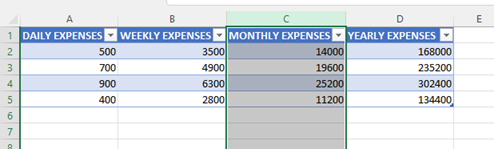
To insert a column in a table, follow these steps:
• Select the column by clicking on the top border. For example if you want to insert a column before column C, click on the header of column C.
• Right click on the mouse and you will get a variety of options.
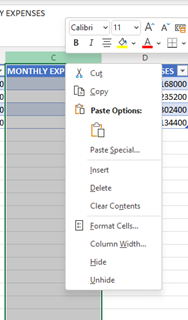
• Find the ‘insert’ option and click on it.

Continuous Cell Range: When the cells are next to each other, then it is contiguous cell range because they are in a continuity.
Non-Continuous Cell Range: When the cells are not next to each other, then it is non-contiguous cell range because they are not in a continuity.